ATtiny85 Digispark & 8-bit AVR
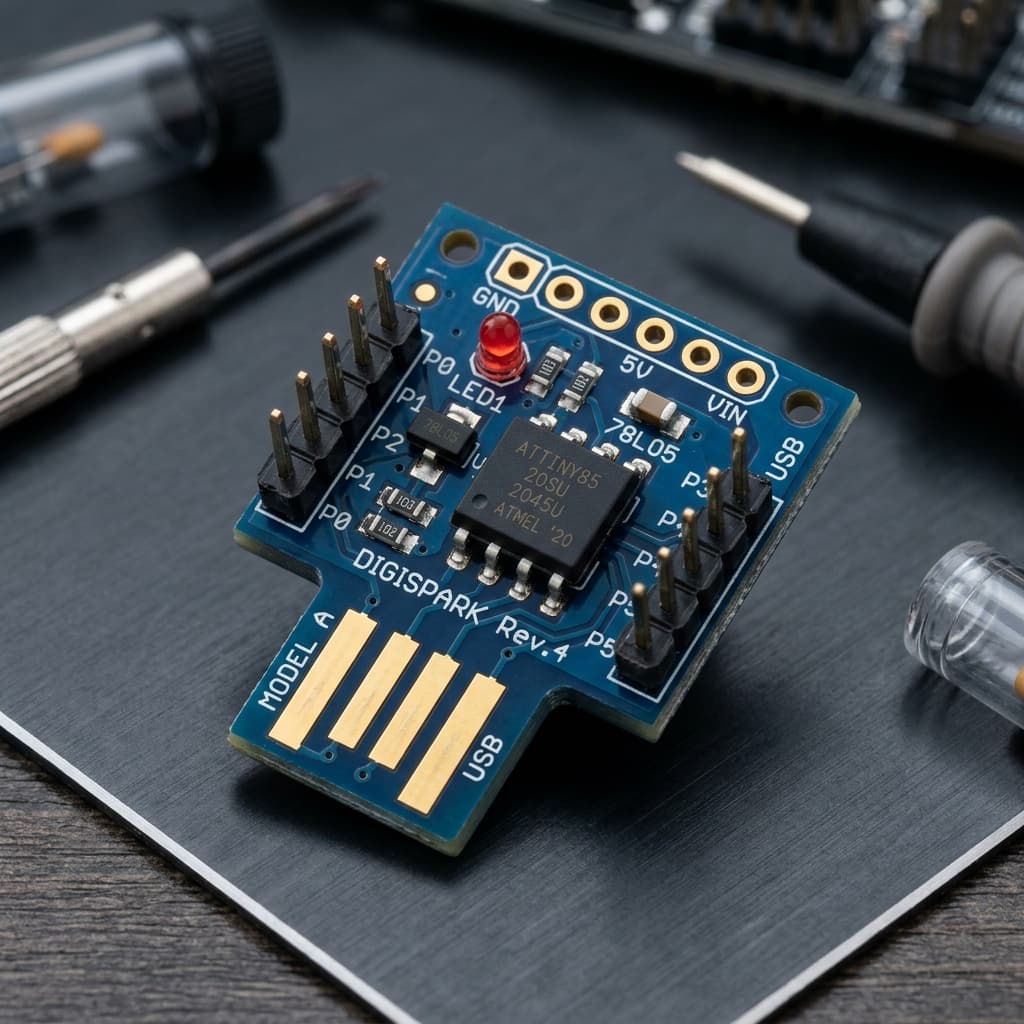
What is ATtiny85 Digispark & 8-bit AVR?
The ATtiny85 Digispark is an ultra-compact, postage-stamp-sized development board powered by the Microchip (Atmel) ATtiny85 8-bit AVR RISC microcontroller running at 16.5 MHz. Built with PCB trace USB contacts that plug directly into any computer USB-A port without requiring cables, it represents the ultimate minimalism in embedded hardware.
Equipped with 8 KB of flash memory (~6 KB usable with bootloader), 512 bytes of SRAM, and 6 versatile I/O pins, the Digispark leverages the revolutionary V-USB software USB library to emulate USB Human Interface Devices (HID)—making it celebrated worldwide for BadUSB automated penetration testing payloads, physical macro pads, and miniature single-purpose electronics trinkets.
Technical Specifications
Recommended Applications & Industry Uses
BadUSB & Automated Keystroke Payloads
Injects pre-programmed keystroke scripts into host PCs at lightning speeds disguised as a standard USB keyboard for authorized penetration tests.
Physical Macro Pads & Media Controllers
Connects rotary encoders and pushbuttons to execute complex hotkeys (mute, pause, volume control, app launching) via USB HID.
Wearable Electronics & Cosplay Miniatures
Fits inside rings, jewelry, and props to drive smooth pulsing NeoPixel LEDs or read miniature tilt/vibration switches.
Single-Purpose Power & Logic Monitors
Operates as a watchdog timer, power sequencer, or smart battery voltage cut-off switch in tight electronics enclosures.
Key Features & Architectural Highlights
Direct-Plug USB Interface
No Cables RequiredPlugs directly into any computer USB-A port. Eliminates cords, bulk, and extra parts for the most discreet physical form factor imaginable.
BadUSB & HID Keyboard Emulation
V-USB Software StackEmulates a standard USB keyboard or mouse directly in firmware using the V-USB library, allowing rapid automated keystroke payload injection.
High-Frequency Internal Oscillator
16.5 MHz PLLRuns at 16.5 MHz using the internal PLL and calibrated RC oscillator, satisfying USB 1.1 timing constraints without an external quartz crystal.
Ultra-Miniature Footprint
25 x 18 mmSmaller than a postage stamp and weighing under 3 grams. Easily conceals inside miniature housings, wearables, and custom cable plugs.
Lowest-Cost Microcontroller
Sub-$1.50 CostCosts less than a cup of coffee while providing full Arduino IDE C/C++ programming capabilities and 5V logic compatibility.
Autonomous Standalone Operation
7V - 12V VIN RangePower via computer USB or attach a 9V battery or 12V DC supply to the VIN pin for untethered standalone gadget deployments.
Pin Configuration & Peripheral Layout
Digital I/O Pins (P0 - P5)
6 multi-function pins operating at 5V logic. Up to 40mA source/sink per pin.
- P0 (PB0) hosts hardware I2C SDA and SPI MOSI with PWM capability
- P1 (PB1) connected to onboard user LED, hosts SPI MISO and PWM output
- P5 (PB5) functions as the hardware RESET pin by default (weak I/O unless fused)
Analog Input Channels (ADC1 - ADC3)
4 high-speed 10-bit analog-to-digital converter channels reading voltages from 0 to 5V.
- Pin P2 = ADC1, Pin P3 = ADC3, Pin P4 = ADC2, Pin P5 = ADC0
- Selectable internal 1.1V and 2.56V bandgap voltage references for precision measurement
- Hardware analog comparator with configurable interrupt threshold
USB Data Lines & Power Distribution
V-USB software communication pins and onboard voltage regulation rails.
- Pin P3 is tied to USB D+ via a 1.5k pull-up resistor (avoid heavy loads at boot)
- Pin P4 is tied to USB D- through series zener clamping diodes
- VIN pin accepts 7V to 12V; 5V pin supplies regulated 5V power up to 500mA
Communication Protocols
V-USB Virtual HID
Pins P3 (D+) & P4 (D-)
Bit-banged USB 1.1 protocol sending keystrokes, mouse clicks, and raw HID reports to any host operating system.
Software UART Serial
Any Available GPIO
Bit-banged serial communications via the DigiCDC or TinyDebugSerial libraries up to 115200 baud.
USI Two-Wire (I2C)
Pin P0 (SDA) & Pin P2 (SCL)
Universal Serial Interface operating in TWI mode to communicate with OLED screens and I2C sensors.
USI SPI Protocol
Pin P0 (DO), P1 (DI), P2 (SCK)
Hardware synchronous serial interface running up to 2 MHz for shift registers and RF transceivers.
Hardware PWM (x3)
Pins P0, P1, P4
8-bit timer pulse-width modulation for smooth LED fading and miniature servo angle positioning.
Micronucleus Bootloader
USB Bus Enumeration
Innovative 1.5 KB USB bootloader that polls for code uploads for 5 seconds after insertion.
Advanced Topics & Expert Knowledge
DigiKeyboard Keystroke Automation
Emulate standard USB keyboard strokes using DigiKeyboard.h to automate administrative setup tasks or security penetration testing demonstrations.
Pro tip: Always prepend a 1000ms delay at the start of your sketch to allow the OS USB HID driver enumeration to complete.
Micronucleus Flashing Sequence
Unlike traditional Arduinos, you must press "Upload" in the Arduino IDE FIRST, and then physically insert the Digispark into the USB port when prompted.
Pro tip: If uploading fails, use a USB 2.0 hub; modern USB 3.2 ports sometimes fail to enumerate the software-bit-banged V-USB handshake.
TinyWireM Micro OLED Interface
Use the optimized TinyWireM library with SSD1306 displays to render graphics and readouts within the constrained 512 bytes of SRAM.
Pro tip: Use text-only rendering without a full 1024-byte framebuffer, as the ATtiny85 only has 512 bytes of total RAM.
Extreme Low-Power Standalone
Disable the ADC, power-down the internal PLL, and enter Power-down sleep mode. The ATtiny85 draws less than 5 µA, running for years on a coin cell.
Pro tip: Desolder the onboard 5V regulator and power LED to achieve true microamp-level current draw on CR2032 cells.
PB5 Reset Pin as General GPIO
Pin P5 is hardwired as RESET. By programming the RSTDISBL fuse via high-voltage serial programming, P5 unlocks as a full 6th GPIO pin.
Pro tip: Warning: Disabling the reset pin prevents future USB bootloader flashing unless reset with an HV programmer.
512 Bytes Internal EEPROM
Store persistent device configuration settings and keystroke payload scripts across reboots in 512 bytes of internal non-volatile EEPROM.
Pro tip: Use EEPROM to maintain an "already-executed" flag so BadUSB payloads execute only once per target machine.
Recommended Applications & Industry Uses
BadUSB & Automated Keystroke Payloads
Injects pre-programmed keystroke scripts into host PCs at lightning speeds disguised as a standard USB keyboard for authorized penetration tests.
Physical Macro Pads & Media Controllers
Connects rotary encoders and pushbuttons to execute complex hotkeys (mute, pause, volume control, app launching) via USB HID.
Wearable Electronics & Cosplay Miniatures
Fits inside rings, jewelry, and props to drive smooth pulsing NeoPixel LEDs or read miniature tilt/vibration switches.
Single-Purpose Power & Logic Monitors
Operates as a watchdog timer, power sequencer, or smart battery voltage cut-off switch in tight electronics enclosures.
Programming on ATtiny85 Digispark & 8-bit AVR
📚 Official Citations & Technical References
To ensure the absolute accuracy and reliability of this guide, all specifications, pinouts, and register settings have been cross-verified with official manufacturer documentation:
Related Resources
Frequently Asked Questions
Why does the Arduino IDE say "Device not found" when uploading to Digispark?
With the Digispark Micronucleus bootloader, you must click "Upload" in the Arduino IDE BEFORE plugging the board into your computer. When the console says "Plug in device now", insert the Digispark into the USB port within 60 seconds.
Why can’t I use pins P3 and P4 for normal digital I/O?
Pins P3 and P4 are connected directly to the USB D+ and D- communication lines. If your sketch requires ongoing USB communication (such as DigiKeyboard), avoid connecting external circuits to P3 and P4 that would disturb USB signaling.
How much flash memory is available for my code on the ATtiny85?
The ATtiny85 has 8,192 bytes of total Flash memory. The onboard Micronucleus USB bootloader occupies approximately 2,176 bytes, leaving 6,016 bytes for user code and variables.